
October 19, 2011
Gothic Glam
July 11, 2011
Wise Tips For Smokey Eyes
 You may think star quality make up is out of your reach, but anyone can achieve that smoldering smokey eye from the red carpet in just 4 easy steps. The smokey eye is appropriate for most ages and goes with almost any outfit. It can be applied as light or as dark as you want it to be. I enjoy this look when going out to dinner or to a party. Take a look at my eye below as I lead you through the application, step by step.
What you will need:
Eye lid primer
3 eye shadows
3 make-up brushes
Liquid eye liner
Black mascara

Step One:
Sweep a light shadow with a little shimmer on your whole lid, from lash line to brow bone using a shadow brush. Choose a shadow that is about one shade lighter than your skin tone. I use Phloof! from MAC.

Step Two:
Using a smaller shadow brush, gently tap a dark shadow ( Bronze from MAC) onto your upper lid, crease, and under your lower lashes.

Step Three:
Choose a dark brown, charcoal grey, or black eye shadow. I use Black Tide from MAC. Using a small angled brush generously apply the dark shadow into your upper lash line and lower lash line. The key is to properly blend the dark shadow into the lighter ones.

Step Four:
Line the entire eye with black liquid liner, top and bottom. Curl and coat lashes with black mascara to finish it off. Choose a volumizing mascara such as Plush Lash from MAC. If you are looking for a very dramatic look add false eyelashes!
WISE TIPS
Before applying your eye make up, use a prep and prime cream on your lids to help prevent the eye shadow from clumping in your creases and to help it last longer. I use the medium shade of primer from MAC. Also, you may want to hold a tissue under your eye to catch the extra shadow that may fall. Pair the smokey eye with a lighter lipstick or gloss. Remember you want the focus to be on your eyes.
You don't have to be walking the red carpet to wear this smoldering look. Give it a try for your next summer party, and you can bet the barbecue won't be the only thing that is smoking hot!!!
July 1, 2011
Sprinkle Your 4th With Red, White, and Blue!!
Many of us are heading off to a 4th of July bar-b-que this weekend and trying to think of something to bring to the celebration of our country's birth. If you're like us, you want to think of something no one else will think of to bring to share in the festivities. Here are a few easy WISE IDEAS to sprinkle your holiday!

Ingredients:
12 ounce bag of white chocolate chips
Strawberries
Blue sprinkles, blue sugar, or edible blue glitter
Directions:
1. Melt 12 ounces of white chocolate chips in a microwave according to the package directions (make sure the container and berries are dry; even a little moisture will alter the texture of the chocolate.
2. One at a time, dip strawberries into the chocolate and then into the blue sprinkles, sugar, or edible glitter.
3. Set them to harden on waxed paper.
*This recipe is from the Disney's Family Fun website.

Rice Krispy Treats
Ingredients:
3 table spoons of butter
1 package (10 oz.) of marshmallows
6 cups of Rice Krispies
Blue and red M&M's
Red, white, and blue sprinkles
Directions:
1. In a large saucepan melt butter over low heat. Add marshmallows and stir until completely melted. Remove from heat.
2. Add cereal, M&M's, and sprinkles. Stir until well coated
3. Using a buttered spatula or wax paper evenly press mixture into a pan coated with cooking spray. Cool. Cut into squares.
*This is the original recipe from Rice Krispies with a little twist.

Chocolate Covered Pretzels
Ingredients:
12 ounce bag of white chocolate chips
1 Bag of large pretzel sticks
Red, white, and blue sprinkles
Directions:
1. Melt 12 ounces of white chocolate chips in microwave or on stove top.2. Dip pretzel in melted chocolate a little less than half way.
3. Roll in sprinkles and set on wax paper to harden.

Red Velvet Cake Pops
Ingredients:
Ingredients:
1 box (18 ounces) of Red Velvet cake mix
1 box (3.4 ounces) of chocolate pudding mix
4 eggs
1 cup water
1/3 cup vegetable oil
1/2 cup cream cheese frosting
1/2 cup cream cheese frosting
12 ounces of white chocolate
Red, white, and blue sprinkles
24 sticks or long toothpicks
24 sticks or long toothpicks
Directions:
1. Preheat oven to 350 degrees. Spray one 13X9X2 sheet pan or two 8 in. or 9 in. round pans with vegetable pan spray
2. In a large bowl, combine cake mix, pudding mix, eggs, water and oil; beat at medium speed with electric mixer for 2 minutes. Pour into prepared pan.
3. Bake 30-35 minutes for round pans; 35-45 minutes for sheet pan, or until toothpick inserted in center comes out clean. Cool in pan for 10 minutes; remove from pan to cooling grid and cool completely. Divide cake in half, freeze on half for future use.4. In a large bowl, use hands to crumble cake until no large chunks remain. Add icing; mix with fingers until well combined. Form mixture into cake balls. Chill in refrigerator at least 2 hours.
5. Melt chocolate; dip sticks into melted chocolate and insert into cake balls. Let them harden. Wait until candy is completely firm before dipping into chocolate. The dip in sprinkles and let them harden.
*This receipe is from Wilton.If you don't have time or don't enjoy baking, you can purchase 4th of July Tootsie Rolls and Tootsie Pops and put them into cute red, white, and blue little buckets.

All of these recipes are quite a hit with children, and adults, too. We hope everyone has a save and happy 4th of July!
June 5, 2011
Wise Tips For Window Treatments
Installing curtain rods can be frustrating, irritating, and can really drive you crazy. I recently installed 11 sets of rods in a client's house, so I now feel like an expert! Here are some things I did that helped the installation process run smoothly.
Steps for hanging:
1. Take curtains out of their packaging and place them in a dryer with a damp white was cloth.
2. Once the wrinkles are removed, put them on the rod and hold the rod up to where you want to hang it. Make sure the curtains barely rest on the ground.
3. Make a small mark on the wall to note where the rod should be.
4. Use a ruler to measure up from the window and over from the window. Allow enough room on each side of the window for the curtains, about 5 to 10 inches.
5. Using the electric screw driver, screw in the first piece of hardware. Then use the regular screw driver to tighten, as needed (If you don't have an electric screw driver, borrow one!)
6.Use the same measurements for the other side of the window.
7. Put the rod up on the hardware.
8. Steam with a hand steamer, if needed.
9.Stand back and enjoy the view, if the curtains are open!
10. Need help, give me a call!

Tools Used:
Electric screw driver
Regular screw driver
Ruler
Pencil
Ladder or stool
Much Patience
Steps for hanging:
1. Take curtains out of their packaging and place them in a dryer with a damp white was cloth.
2. Once the wrinkles are removed, put them on the rod and hold the rod up to where you want to hang it. Make sure the curtains barely rest on the ground.
3. Make a small mark on the wall to note where the rod should be.
4. Use a ruler to measure up from the window and over from the window. Allow enough room on each side of the window for the curtains, about 5 to 10 inches.
5. Using the electric screw driver, screw in the first piece of hardware. Then use the regular screw driver to tighten, as needed (If you don't have an electric screw driver, borrow one!)
6.Use the same measurements for the other side of the window.
7. Put the rod up on the hardware.
8. Steam with a hand steamer, if needed.
9.Stand back and enjoy the view, if the curtains are open!
10. Need help, give me a call!
Window treatments can do many things for a room. They can add color, texture, and warmth. Of course, they can also darken a room when closed. They can be purchased anywhere from Target to Pottery Barn.
Take a look at some of these window treatments to see which style you prefer for your home.

May 10, 2011
Dish Soap In Disguise

My mom and I have a wise idea for disguising our bottles of dish soap. We don't like having soap containers sitting out on our kitchen counters, and we don't like to have to get the soap out from under our sinks. Instead, we put our dish soap in decorative olive oil bottles, which are pleasing to the eye and quite handy. You can find an olive oil bottle that matches your kitchen decor, in many styles and colors. If you can't find the perfect one for your kitchen, you can purchase a plain one and paint your own design on it.
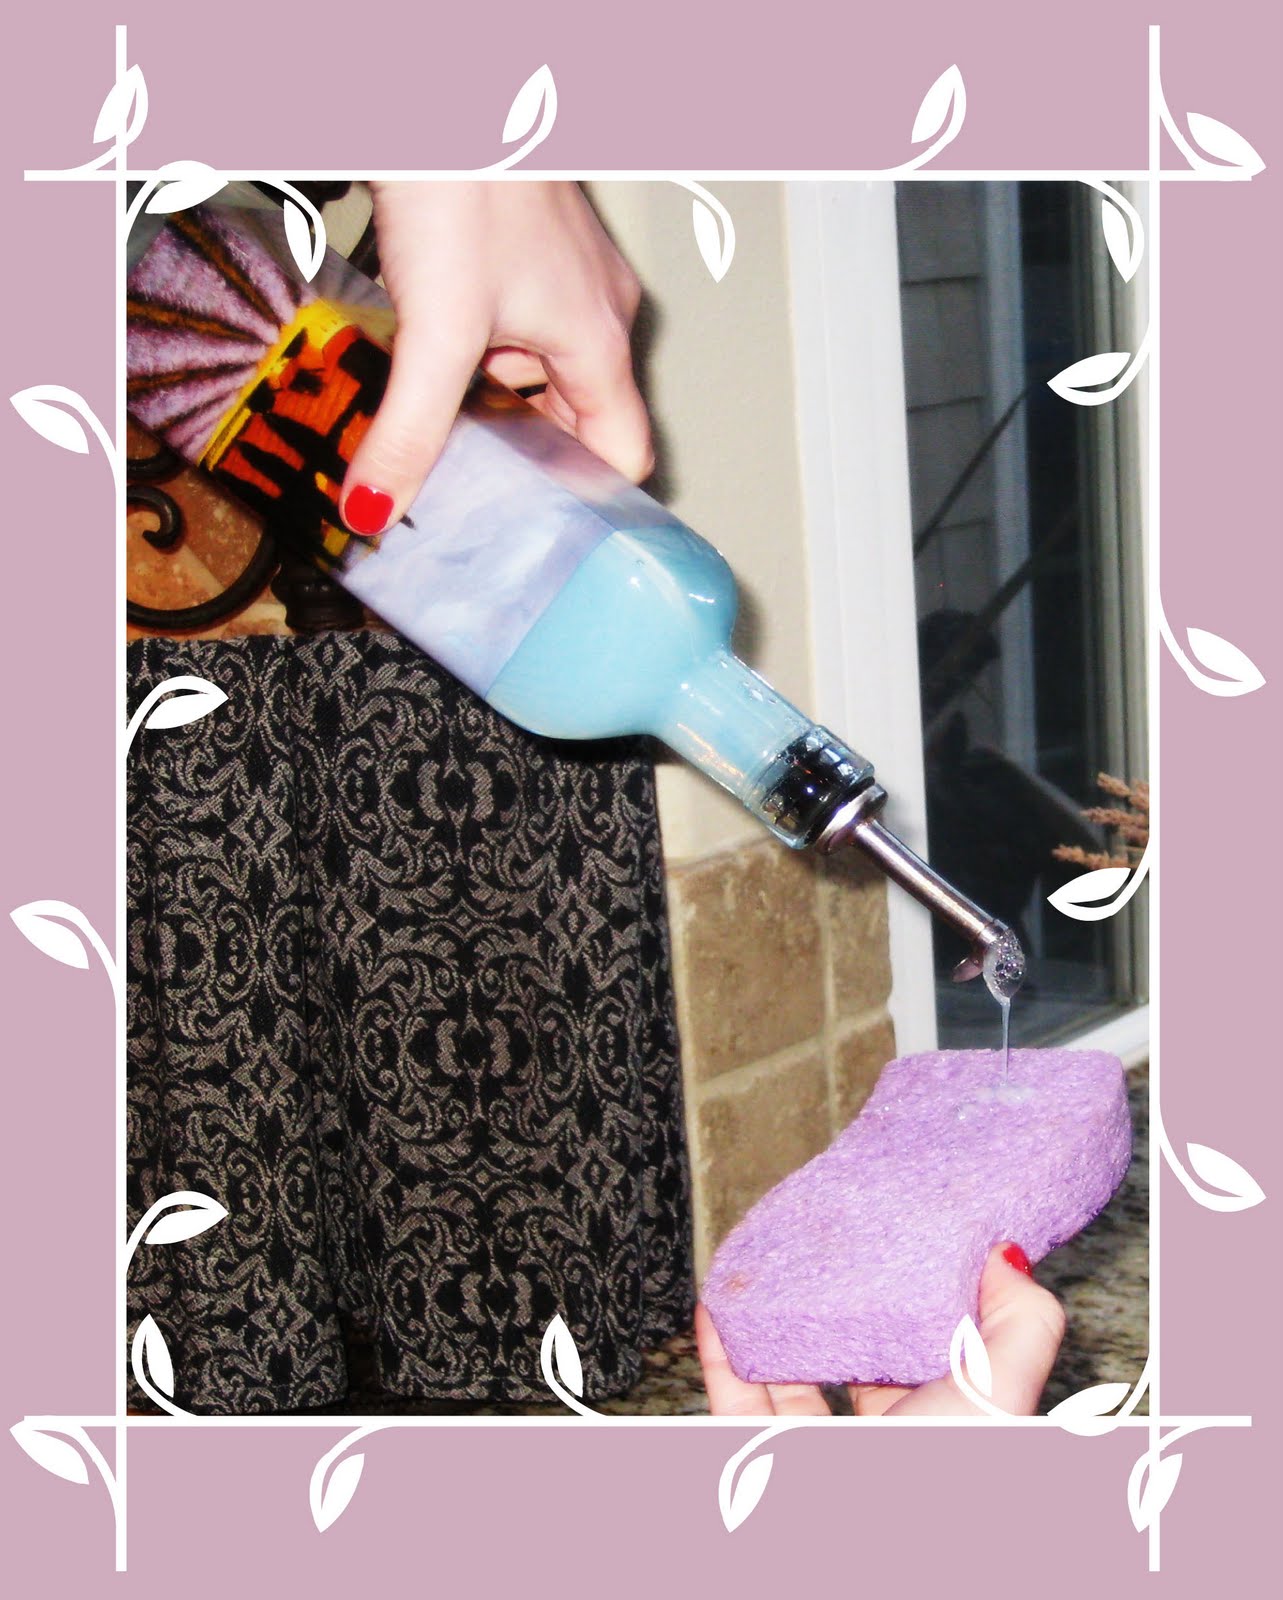
We like how the spout at the top allows you to pour just the right amount of soap.

We also think this makes a great hostess or house warming gift. During the holidays, you can find bottles with special designs or paintings, like poinsettias or holly berries. If you like this wise design idea, you can find this bottle and many more at Paisley Creek. We have even seen, and purchased, some of our olive oil bottles at Ross and TJMaxx.
Your dish soap never looked so good!!

May 1, 2011
A Clever & Crafty Bow

I was wrapping my parents' Easter gift and realized I didn't have a bow to match the paper. I decided I would just make my own with the left over wrapping paper!
Here are the 6 simple steps.

First, cut 6 retangles of wrapping paper. Mine measured 4"x 6", but you may want to cut your rectangles smaller or larger depending on the size of your gift.

Second, take each of the rectangles and fold them in half.

Third, cut three slits in each of the folded rectangles. Cut on the fold. Make sure you don't cut all the way through the rectangle, leave about a half of an inch at the end.

Next, gather the ends together and staple. Do this to all 6 rectangles.

Next, staple two sets of 3 together. These will form the sides of the bow.
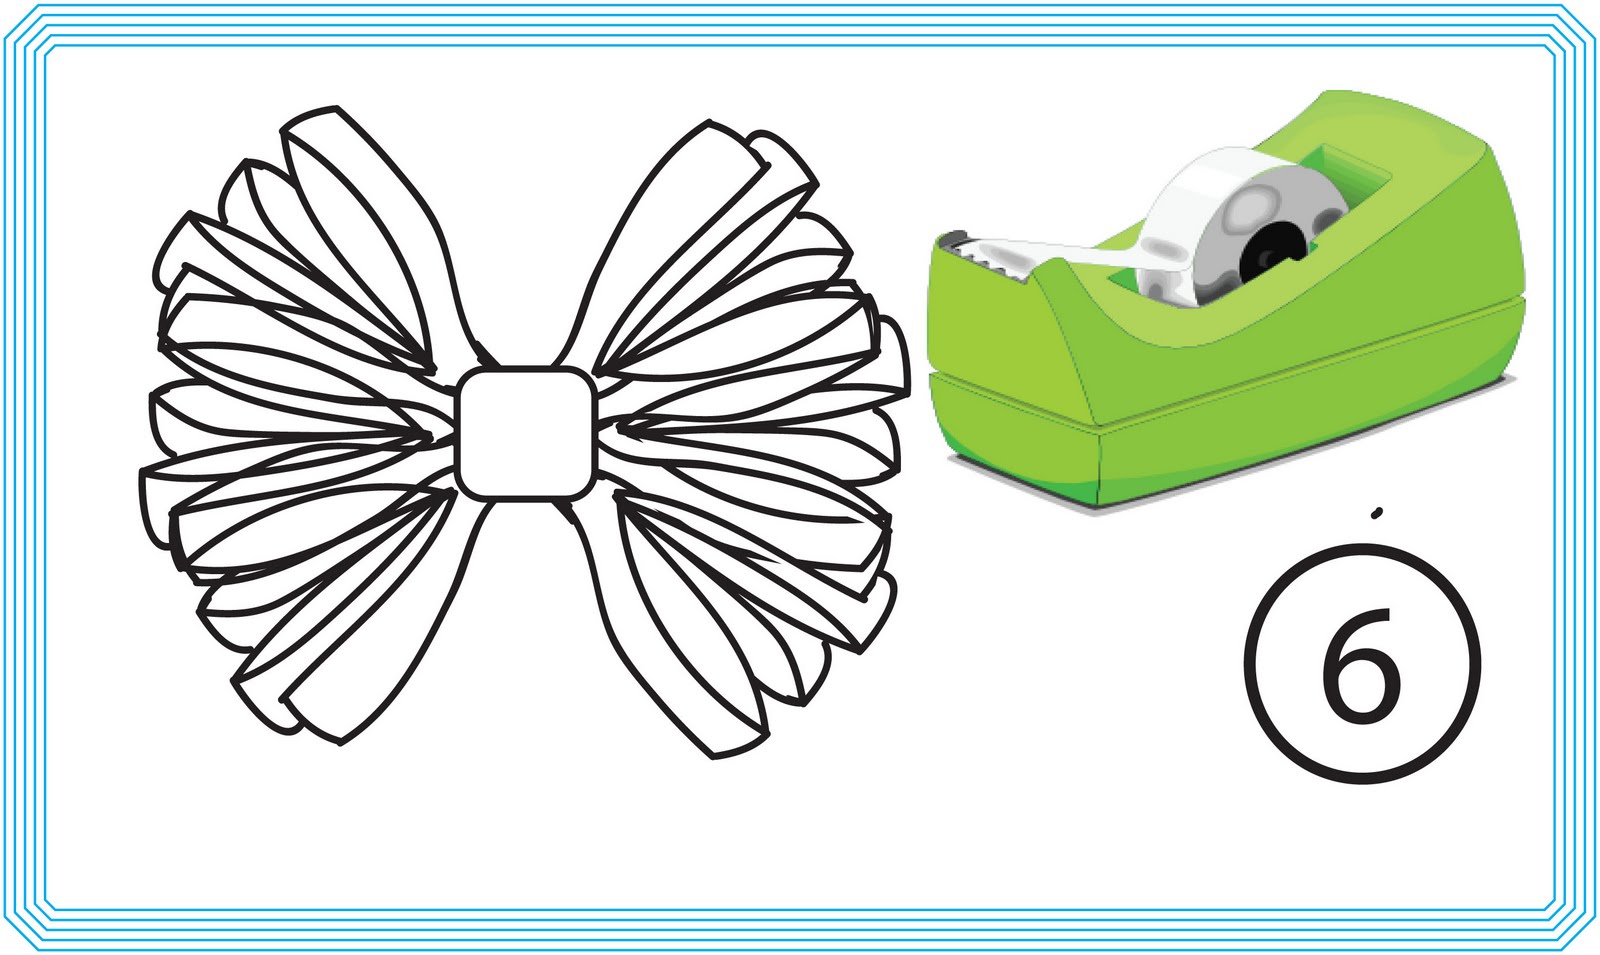
Last, staple the two sides together. Cut a small piece of wrapping paper and fold it in thirds. Tape it down in the center of the bow and finally tape the bow to your gift!

April 17, 2011
Get Hoppin' In The Kitchen
 |
Prep Time: 30 Minutes
Total Time: 2 Hours and 10 Minutes
What You Will Need For The Cool and Creamy Coconut Cake
1 box yellow cake mix
water, vegetables oil, and eggs called for on the cake mix box
water, vegetables oil, and eggs called for on the cake mix box
1 can (14 oz.) sweetened condensed milk
1 can (12 oz.) cream of coconut
1 container of cool whip
1 cup shredded coconut
1 can (12 oz.) cream of coconut
1 container of cool whip
1 cup shredded coconut
What You Will Need To Decorate
a tray or a piece of cardboard, covered with foil
white construction paper
jelly beans or robin's eggs
green food coloring
1 cup coconut

Heat oven to 350°F. Make cake as directed on the box for two 8 inch or 9 inch round pans. Using a fork or skewer, poke holes in the entire cake. After mixing condensed milk and cream of coconut, slowly pour over warm cake. Cool cake completely.

Place cake upright with the cut edge down on the tray. (If you prefer the Carrot Cake, follow the directions of the box and frost with cream cheese frosting instead of cool whip.)


Shake 1 cup coconut and 3 drops of the green food coloring in a tightly covered container until evenly tinted. Surround bunny with green coconut grass.
Add additional jelly beans or robin's eggs if desired.

April 10, 2011
A Fresh Look For Spring, Or Any Time Of Year
Choosing a paint color for a room can be challenging and overwhelming because there are so many colors to choose from. Luckily, Sherwin Williams created a free online
Color Visualizer to help you see what your room will look like before you paint it.
Color Visualizer to help you see what your room will look like before you paint it.
My parents felt like their living room needed a little color, so we decided to paint an accent wall. An accent wall is using color to treat one wall differently from all the others in a room. It adds excitement and importance to a space. Pick a wall with a major focal point such as a fireplace wall, an unusual shaped wall, walls holding dramatic artwork, or the wall behind a bed's headboard. This is where your eye goes first. An accent color makes a focal point more dramatic. We chose the wall with the fireplace in my parent's living room. We weren't sure what color we wanted, so we gave the Color Visualizer a try. We tried gold to compliment the brown couches and the rock fireplace, seafoam green to pull in the accent color on the pillows and accessories, and brown for a rich, warm feeling. We took a picture, uploaded it into the program, and then tried the three colors.

My parents liked the seafoam green, but went with the brown. They felt like their fireplace stood out in the room too much because of its size, but the brown really softened the look, and I agreed! Brown is a great neutral color, so they can still switch out pillows and other accessories depending on the season. I painted the wall for them in just a few hours. They have been happy with the results and have received many compliments on their color choice.

Click HERE to try this fabulous free program with a photo of your home. If you still feel unsure of your paint color choice after trying the program, you should consider hiring an Interior Designer. Let me know if you need help!
{1} Choose an inspiration piece in your room and pull a color from it. For example, a rug, accent pillows, or art work.
{2} Check out Sherwin Williams and give the Color Visualizer a try before you purchase your paint.
{3} If you like more than one color, purchase a small sample can and try painting a little before doing the whole wall.
{4} Don't be afraid to try bold color!
{5} When painting, tape all molding, cut in the edges with an angled brush, and make sure you have the right roller cover for the textured surface you are working with.
{6} Cover all flooring and furniture.
{7} Wear old clothing. No matter how careful I am, I always seem to get paint on my clothes.
{8} Open doors and window to air out the room and to help the paint dry. Wait 24 hours before hanging anything on the wall or pushing furniture back into place.
{9} Keep in mind, the paint color changes a bit as it dries.
{10} Enjoy your room's new look!
April 3, 2011
An EGGceptional Idea For Spring
 I was recently inspired with an idea when I visited the Pottery Barn in San Jose. I loved all of their spring decorations, but this "Happy Easter" display really caught my eye. It was hanging above one of their
dining room tables.
While I was there, I picked up their spring catalog. The catalog showed the holiday eggs being used as center pieces on the table, too.

I wanted to make my own version of this spring display at Dolce Home, where I work as an interior designer. Although they have the holiday eggs for sale at the store or online at Pottery Barn.com, I decided to make my own with a few changes. First, I wanted mine to be multi-colored. Instead of white eggs I chose light blue, light pink, and light yellow eggs from Joann Fabric and Craft Store. Second, I wanted to use a decorative ribbon instead of twine, so I chose a cream ribbon with scalloped edges. Next, I bought black scrapbook letters to use instead of painting on the letters. Last, I wanted the eggs to say
"Happy Spring" instead of "Happy Easter" so that the display could hang in the shop for all of spring!
"Happy Spring" instead of "Happy Easter" so that the display could hang in the shop for all of spring!

Everyone who visits the shop loves our new spring display. So, thank you Pottery Barn for giving me the EGGcellent idea to create my own "Happy Spring" eggs!!
March 27, 2011
A Fashion Must Have
If Spring has sprung, why does it still feel like Winter? No matter the season, this is a fashion must have. The open front cardigan can be worn in Spring, Summer, Fall, or Winter. It's our favorite cover up! It's comfy and easy to wear. Dress it up with skinny jeans and heels, or down with leggings and Uggs. It looks great over almost anything: tank tops, long sleeves, blouses, sweaters, and even dresses. We love being able to wear a light weight summer top during the cooler months by just throwing a cardigan over it. The cardigan can be paired with funky belts, hats, scarves, chunky or long necklaces, and of course boots! We love that this accessory looks great on any body type and on women of all ages. You can find a great open front cardigan almost anywhere. Prices will vary, from $10 to $100, depending on the location. Mom and I have found some great ones recently at Ross, Marshalls, TJMaxx. They are also available at Target, Forever21, Gap, and Nordstrom. Even the Stars enjoy this fashion must have!

March 20, 2011
A Decorative St. Patrick's Day Note Tag

This decorative note tag could also be used on a bottle of beer, champagne, or Martinelli's cider, or it could be used as a gift tag. After the bottle or gift is opened, the hostess can use the tag as a decoration. It can be hung on a key hook or a door knob.

March 13, 2011
A Towel Stand With A Twist
We both purchased this small counter towel stand, and have found many wise uses for it!! Mom uses it for hand towels in the kitchen and I use it for headbands and scarves in my bedroom. It can also be used for necklaces and bracelets, hand or tea towels in the bathroom, or even for a couple rolls of toilet paper. We found ours at Ross for a great price, but the stand can also be purchased online at A Touch of Class. If this look doesn't fit in with the interior of your home, you can also find other versions of the towel stand on Amazon or at Bed Bath & Beyond.
A Wise Suggestion: We think this stand would make a great hostess gift with a set of kitchen towels. Mom gave this to my aunt, and has enjoyed giving her holiday towel sets to hang in her kitchen throughout the year.
Let us know if you like this Wise Design idea!!


March 6, 2011
Aly's 24th Birthday
For our first post, we'd like to offer a few ideas from our most recently planned birthday party, which happened to be mine! Mom was thinking of a "Happy Birthday Little Lady" theme with cute red and black ladybugs, but I had a more mature black and white theme in mind. After all I was turning 24, not 2+4!
We think every party theme needs at least four essential items to make it a success; paper goods, invitations, decorations, and a cake!! Here are our four....
 Paper Goods: My mom found this great damask print made by Amscan at ShinDigz.com called "Always and Forever." It features a black and white damask pattern, with a pale blue trim and dot accents . The pattern was designed for a wedding or bridal shower, but can also be used for other occasions, like my birthday! We chose the pieces that only had the damask pattern; the cups, cake plates, and small napkins. We paired them with plain black dinner plates and large black napkins .
  Invitations: Since the matching invitations were for another occasion, mom gave me the task of creating my own . I used a black and white damask print for the background and an elegant curl in a matching pale blue. I added black dots to really tie it all together . I then sent them to my local print shop to be printed on card stock . The invitations turned out exactly as I had hoped they would!!
Decorations: Our theme was simple, black, white, and blue, so we thought simple decorations would be best. Some of our decorations were a birthday banner, balloon bouquets, and candy dishes with matching M&M's from Powell's Candy Shoppe. We used martini glasses as our candy dishes which enabled guests to see the colorful candies, and at the same time gave it a fun and festive look!! This was our downscaled version of a candy buffet, which are very popular for almost all occasions. (Check out Candy Buffet Creations to see where we got our inspiration!!) We also used a decorative decanter with an iron stand to serve lemonade. By adding a few drops of food coloring to our lemonade we made it a beautiful blue, which matched everything else perfectly. We then topped it off with a splash of Sprite and lemon slices from my mom's very own lemon tree!!

Everyone who attended our party seemed to really enjoy themselves, especially me!! Mom and I were extremely satisfied with how our party ideas turned out and we can't wait to plan our next one...My dad's 50th!!!
February 27, 2011
The Wise Women Behind The Wise Designs

My Mom, Liz, has been an elementary school teacher for the past 26 years. During her free time, she enjoys working on design projects for her home, planning theme parties, and shopping for that perfect gift, or home accent piece, for friends and family members.
I received my interior design degree from CSU, Chico and currently work as a junior designer at Dolce Home. Art has always been one of my passions and I feel blessed to be working in a field where I can use my artistic talents. Some things I enjoy doing in my free time are designing furniture, creating graphic designs, working on arts and crafts, shopping for clothing and home decor, and keeping up to date on the latest fashions and trends.
We hope you will find our Wise Design ideas helpful and entertaining. Add our blogspot to your Favorites and check back every week to read about our newest projects and design ideas!!
Subscribe to:
Posts (Atom)