November 18, 2011

Wise Table Settings

With the holidays right around the corner, you're bound to be entertaining guests. Whether you are having a casual dinner or a fancy party, it is important to have a properly set table. Here are the correct ways to set your table informally and formally.
Once you have your place settings layed out, you will need to add the finishing touches to your table.   Choose placemats, floral arrangements, vases, candles, runners, place cards, menus, or any other kind of accessories to match your theme. Here are some holiday table settings that may inspire you!
 
Visit these websites for fabulous table settings and accessories:


November 6, 2011

Wickedly Delicious Caramel Apples


Caramel apples were invented in the 1950's, and today they are still a favorite for fall festivals and Halloween parties . These gooey treats are most popular during this time of year because of the apple harvest .  For Halloween , I decided to make caramel apples for my family as a special treat . I added a few trick - or - treat favorites that I knew my family would enjoy, like Snickers , Reese's Peanut Buttercups, and lots of chocolate .


Here's what you'll need to make them :
2 bags of Kraft Caramels with sticks ( you can find them at Safeway )
4 table spoons of milk
butter
6 medium apples ( pick your favorite kind )
1 bag of white chocolate chips
1 bag of milk chocolate chips
1 bag of mini Snickers, Reese's Peanut Buttercups, or any kind of your favorite candy
You can also use nuts, candy sprinkles, cinnamon, pumpkin spice, etc.


Prepare apples and pan .
Wash the apples and dry them thoroughly . If there is any moisture on the apples the caramel will not stick to them . Insert sticks into the top of each apple . Rub a stick of butter to coat  a non-stick cookie sheet .


Prepare the caramels . 
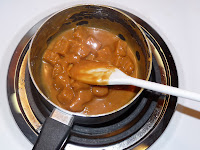
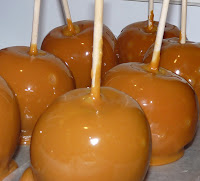
Unwrap all of the caramels and place them in a small metal pot . Add 4 tablespoons of milk and melt over a medium heat . Stir continuously to avoid burning the caramel . Once the caramels are fully melted , dip each apple . Hold the apple over the pot and let the excess caramel drip off . Use a knife to scrape the extra caramel off the bottom , and then place them on the buttered cookie sheet . ( DO NOT USE WAX PAPER like most recipes call for . Your apples will stick to the paper and won't come off!! ) Place cookie sheet in the refrigerator for about 15 minutes or until the caramel has hardened .

Melt the chocolate .
Fill a pot of water half way full . Bring to a boil . Put chocolate chips in a smaller pot and place in boiling water . Make sure you don't get any water in the chocolate , it will ruin it!! Do this for both the white and milk chocolate . ( I added food coloring to the white chocolate to make it orange. ) Once the chocolate is melted dip the caramel covered apple in it .

Preparing the candy .
Chop up the candy into small pieces and place on a plate . After dipping the caramel apples into the chocolate , roll them in the candy , and place back on the cookie sheet . Make sure you re-butter the sheet . Use a zip lock bag with a corner cut off as a piping bag . Fill it with the orange colored white chocolate and drizzle over the caramel and candy apple . Then place the cookie sheet back in the refrigerator. Take out 10 to 15 minutes before serving . I recommend cutting the apples into wedges since it is hard to bite through all the layers .


I placed the caramel apples in cellophane bags and tied them with orange ribbon .
  I sent them to my family by packing them in bubble wrap .  They arrived just in time for Halloween .  These gooey caramel apples may have taken a little time to make , but they were definitely worth it!  All treats , no tricks!  My family loved sinking their teeth into them .

You can make these wickedly delicious treats for other holidays as well , by changing the color and the candies that you use .  Give them a try for Thanksgiving or Christmas this year .  They make great gifts!

October 19, 2011

Gothic Glam

Halloween decorations can be quite expensive, sticking their fangs into your bank account and sucking it dry.  So this year I decided that I would create a spooky decoration using recycled wine and beer bottles.  Accumulating this many bottles can take some time, so I went to a local bar and asked for their empty bottles. You can also ask your friends or neighbors to save their left over bottles for you. Once you collect the right amount, it is important to thoroughly clean them using hot water and soap. Make sure to take off any labels or stickers. After the bottles have dried, paint them with the color of your choice. I chose black because I wanted to use the traditional Halloween colors. I then painted each bottle with an orange letter, that when put together spell out Happy Halloween. If you don't feel comfortable free handing your letters, you can use stencils or stickers.  Go to your local craft store and they can help you choose the right ones.  I added a little orange glitter on each letter to glam it up. After the paint on the bottles dried, I sprayed them with a satin clear coat to keep them from chipping. I bought short candle sticks at the dollar store, 6 for a dollar, and stuck them into the top of each bottle. I then added spider webs and a black runner to my table top to finish it off. This arrangement would also look great on a mantel or in a windowsill.  You can also choose different paint colors and wording for other holidays, like Christmas or New Years.  This whole project cost me just over $10, frighteningly frugal!

July 11, 2011

Wise Tips For Smokey Eyes

You may think star quality make up is out of your reach, but anyone can achieve that smoldering smokey eye from the red carpet in just 4 easy steps. The smokey eye is appropriate for most ages and goes with almost any outfit. It can be applied as light or as dark as you want it to be. I enjoy this look when going out to dinner or to a party. Take a look at my eye below as I lead you through the application, step by step. 


What you will need:
   Eye lid primer
   3 eye shadows
   3 make-up brushes
   Liquid eye liner
   Black mascara


Step One:
    Sweep a light shadow with a little shimmer on your whole lid, from lash line to brow bone using a shadow brush. Choose a shadow that is about one shade lighter than your skin tone. I use Phloof! from MAC.


Step Two:
    Using a smaller shadow brush, gently tap a dark shadow ( Bronze from MAC) onto your upper lid, crease, and under your lower lashes.


 Step Three:
     Choose a dark brown, charcoal grey, or black eye shadow. I use Black Tide from MAC. Using a small angled brush generously apply the dark shadow into your upper lash line and lower lash line. The key is to properly blend the dark shadow into the lighter ones.


Step Four:
    Line the entire eye with black liquid liner, top and bottom. Curl and coat lashes with black mascara to finish it off. Choose a volumizing mascara such as Plush Lash from MAC. If you are looking for a very dramatic look add false eyelashes!  


 WISE TIPS
 Before applying your eye make up, use a prep and prime cream on your lids to help prevent the eye shadow from clumping in your creases and to help it last longer. I use the medium shade of primer from MAC.  Also, you may want to hold a tissue under your eye to catch the extra shadow that may fall. Pair the smokey eye with a lighter lipstick or gloss. Remember you want the focus to be on your eyes.

You don't have to be walking the red carpet to wear this smoldering look. Give it a try for your next summer party, and you can bet the barbecue won't be the only thing that is smoking hot!!!

July 1, 2011

Sprinkle Your 4th With Red, White, and Blue!!

Many of us are heading off to a 4th of July bar-b-que this weekend and trying to think of something to bring to the celebration of our country's birth. If you're like us, you want to think of something no one else will think of to bring to share in the festivities. Here are a few easy WISE IDEAS to sprinkle your holiday!

Chocolate Covered Strawberries
Ingredients:
12 ounce bag of white chocolate chips
Strawberries
Blue sprinkles, blue sugar, or edible blue glitter

Directions:
1. Melt 12 ounces of white chocolate chips in a microwave according to the package directions (make sure the container and berries are dry; even a little moisture will alter the texture of the chocolate.
2. One at a time, dip strawberries into the chocolate and then into the blue sprinkles, sugar, or edible glitter.
3. Set them to harden on waxed paper.
*This recipe is from the  Disney's Family Fun website.

Rice Krispy Treats
 Ingredients:
3 table spoons of butter
1 package (10 oz.) of marshmallows
6 cups of Rice Krispies
Blue and red M&M's
Red, white, and blue sprinkles

Directions:
1. In a large saucepan melt butter over low heat. Add marshmallows and stir until completely melted. Remove from heat.
2. Add cereal, M&M's, and sprinkles. Stir until well coated
3. Using a buttered spatula or wax paper evenly press mixture into a pan coated with cooking spray. Cool. Cut into squares.
*This is the original recipe from Rice Krispies with a little twist.

Chocolate Covered Pretzels
Ingredients:
12 ounce bag of white chocolate chips
1 Bag of large pretzel sticks
Red, white, and blue sprinkles

Directions:
1. Melt 12 ounces of white chocolate chips in microwave or on stove top.
2. Dip pretzel in melted chocolate a little less than half way.
3. Roll in sprinkles and set on wax paper to harden.


Red Velvet Cake Pops
Ingredients:
1 box (18 ounces) of Red Velvet cake mix
1 box (3.4 ounces) of chocolate pudding mix
4 eggs
1 cup water
1/3 cup vegetable oil
1/2 cup cream cheese frosting
12 ounces of white chocolate
Red, white, and blue sprinkles
24 sticks or long toothpicks

Directions:
1. Preheat oven to 350 degrees. Spray one 13X9X2 sheet pan or two 8 in. or 9 in. round pans with vegetable pan spray
2. In a large bowl, combine cake mix, pudding mix, eggs, water and oil; beat at medium speed with electric mixer for 2 minutes. Pour into prepared pan.
3. Bake 30-35 minutes for round pans; 35-45 minutes for sheet pan, or until toothpick inserted in center comes out clean. Cool in pan for 10 minutes; remove from pan to cooling grid and cool completely. Divide cake in half, freeze on half for future use.
4. In a large bowl, use hands to crumble cake until no large chunks remain. Add icing; mix with fingers until well combined. Form mixture into cake balls. Chill in refrigerator at least 2 hours.
5. Melt chocolate; dip sticks into melted chocolate and insert into cake balls. Let them harden. Wait until candy is completely firm before dipping into chocolate. The dip in sprinkles and let them harden.
*This receipe is from Wilton.

   If you don't have time or don't enjoy baking, you can purchase 4th of July Tootsie Rolls and Tootsie Pops and put them into cute red, white, and blue little buckets.
All of these recipes are quite a hit with children, and adults, too. We hope everyone has a save and happy 4th of July!

June 5, 2011

Wise Tips For Window Treatments

Installing curtain rods can be frustrating, irritating, and can really drive you crazy. I recently installed 11 sets of rods in a client's house, so I now feel like an expert! Here are some things I did that helped the installation process run smoothly.

Tools Used:
Electric screw driver
Regular screw driver
Ruler
Pencil
Ladder or stool
Much Patience

Steps for hanging:
1. Take curtains out of their packaging and place them in a dryer with a damp white was cloth.
2. Once the wrinkles are removed, put them on the rod and hold the rod up to where you want to hang it. Make sure the curtains barely rest on the ground.
3. Make a small mark on the wall to note where the rod should be.
4. Use a ruler to measure up from the window and over from the window. Allow enough room on each side of the window for the curtains, about 5 to 10 inches.
5. Using the electric screw driver, screw in the first piece of hardware. Then use the regular screw driver to tighten, as needed (If you don't have an electric screw driver, borrow one!)
6.Use the same measurements for the other side of the window.
7. Put the rod up on the hardware.
8. Steam with a hand steamer, if needed.
9.Stand back and enjoy the view, if the curtains are open!
10. Need help, give me a call!

Window treatments can do many things for a room. They can add color, texture, and warmth. Of course, they can also darken a room when closed. They can be purchased anywhere from Target to Pottery Barn.
 Take a look at some of these window treatments to see which style you prefer for your home.

May 10, 2011

Dish Soap In Disguise


My mom and I have a wise idea for disguising our bottles of dish soap. We don't like having soap containers sitting out on our kitchen counters, and we don't like to have to get the soap out from under our sinks. Instead, we put our dish soap in decorative olive oil bottles, which are pleasing to the eye and quite handy. You can find an olive oil bottle that matches your kitchen decor, in many styles and colors. If you can't find the perfect one for your kitchen, you can purchase a plain one and paint your own design on it.


We like how the spout at the top allows you to pour just the right amount of soap.


We also think this makes a great hostess or house warming gift. During the holidays, you can find bottles with special designs or paintings, like poinsettias or holly berries. If you like this wise design idea, you can find this bottle and many more at Paisley Creek. We have even seen, and purchased, some of our olive oil bottles at Ross and TJMaxx.

                         Your dish soap never looked so good!!

May 1, 2011

A Clever & Crafty Bow


I was wrapping my parents' Easter gift and realized I didn't have a bow to match the paper. I decided I would just make my own with the left over wrapping paper!
Here are the 6 simple steps.


First, cut 6 retangles of wrapping paper. Mine measured 4"x 6", but you may want to cut your rectangles smaller or larger depending on the size of your gift.


Second, take each of the rectangles and fold them in half.


Third, cut three slits in each of the folded rectangles. Cut on the fold. Make sure you don't cut all the way through the rectangle, leave about a half of an inch at the end.


Next, gather the ends together and staple. Do this to all 6 rectangles.


Next, staple two sets of 3 together. These will form the sides of the bow.


Last, staple the two sides together. Cut a small piece of wrapping paper and fold it in thirds. Tape it down in the center of the bow and finally tape the bow to your gift!


Making your own bow with matching wrapping paper is fun and gives your gift a custom look. You can also use a complimentary wrapping paper, or if you have a two sided print, use the opposite side. Next time you are wrapping a gift, use this Wise Design and make your own bow!

April 17, 2011

Get Hoppin' In The Kitchen

It's the Year of the Rabbit, so this spring everyone should try making the super cute Betty Crocker Bunny Cake for Easter, or just for fun!! My mom made this cake for Bunko, but she used Paula Deen's recipe for Cool and Creamy Coconut Cake, which is very moist and decadent.  It is  from The Lady and Sons Just Desserts cookbook. If you decide to give Paula's recipe a try, one helpful hint we offer is to look for the cream of coconut in the liquor section of your grocery store. It is the same coconut they use for Pina Coladas

Prep Time: 30 Minutes
Total Time: 2 Hours and 10 Minutes
What You Will Need For The Cool and Creamy Coconut Cake
1 box yellow cake mix
water, vegetables oil, and eggs called for on the cake mix box
1  can (14 oz.) sweetened condensed milk
1  can (12 oz.) cream of coconut
1  container of cool whip
1  cup shredded coconut
What You Will Need To Decorate
a tray or a piece of cardboard, covered with foil
white construction paper
jelly beans or robin's eggs
green food coloring
1  cup coconut
Heat oven to 350°F. Make cake as directed on the box for two 8 inch or 9 inch round pans. Using a fork or skewer, poke holes in the entire cake. After mixing condensed milk and cream of coconut, slowly pour over warm cake. Cool cake completely.
Reserve one layer for another use or to make a second bunny. Cut one layer in half as shown in the diagram below. Put halves together with cool whip to form a body.
 Place cake upright with the cut edge down on the tray. (If you prefer the Carrot Cake, follow the directions of the box and frost with cream cheese frosting instead of cool whip.) 
Cut out notch about 1/3 of the way up one end of the body to form the head as shown in the diagram below. Attach half of cutout piece from tail with toothpicks. Frost with remaining cool whip, rounding body on sides. Sprinkle with the 1 cup coconut. Cut ears from construction paper; press into notch on top. Use jelly beans for eyes and nose.

 Shake 1 cup coconut and 3 drops of the green food coloring in a tightly covered container until evenly tinted. Surround bunny with green coconut grass.
 Add additional jelly beans or robin's eggs if desired.
Click HERE to read reviews and comments on Betty Crocker's Bunny cake!!

April 10, 2011

A Fresh Look For Spring, Or Any Time Of Year

Choosing a paint color for a room can be challenging and overwhelming because there are so many colors to choose from. Luckily, Sherwin Williams created a free online
 Color Visualizer to help you see what your room will look like before you paint it.

My parents felt like their living room needed a little color, so we decided to paint an accent wall. An accent wall is using color to treat one wall differently from all the others in a room. It adds excitement and importance to a space. Pick a wall with a major focal point such as a fireplace wall, an unusual shaped wall, walls holding dramatic artwork, or the wall behind a bed's headboard. This is where your eye goes first. An accent color makes a focal point more dramatic. We chose the wall with the fireplace in my parent's living room. We weren't sure what color we wanted, so we gave the Color Visualizer a try. We tried gold to compliment the brown couches and the rock fireplace, seafoam green to pull in the accent color on the pillows and accessories, and brown for a rich, warm feeling. We took a picture, uploaded it into the program, and then tried the three colors.


 My parents liked the seafoam green, but went with the brown. They felt like their fireplace stood out in the room too much because of its size, but the brown really softened the look, and I agreed! Brown is a great neutral color, so they can still switch out pillows and other accessories depending on the season. I painted the wall for them in just a few hours. They have been happy with the results and have received many compliments on their color choice.


Click HERE to try this fabulous free program with a photo of your home. If you still feel unsure of your paint color choice after trying the program, you should consider hiring an Interior Designer. Let me know if you need help!

Here are a few Wise Design tips for painting:
{1} Choose an inspiration piece in your room and pull a color from it. For example, a rug, accent pillows, or art work.
{2} Check out Sherwin Williams and give the Color Visualizer a try before you purchase your paint.
{3} If you like more than one color, purchase a small sample can and try painting a little before doing the whole wall.
{4} Don't be afraid to try bold color!
{5} When painting, tape all molding, cut in the edges with an angled brush, and make sure you have the right roller cover for the textured surface you are working with.
{6} Cover all flooring and furniture.
{7} Wear old clothing. No matter how careful I am, I always seem to get paint on my clothes.
{8} Open doors and window to air out the room and to help the paint dry. Wait 24 hours before hanging anything on the wall or pushing furniture back into place.
{9} Keep in mind, the paint color changes a bit as it dries.
{10} Enjoy your room's new look!

April 3, 2011

An EGGceptional Idea For Spring


I was recently inspired with an idea when I visited the Pottery Barn in San Jose. I loved all of their spring decorations, but this "Happy Easter" display really caught my eye. It was hanging above one of their
dining room tables. 

While I was there, I picked up their spring catalog. The catalog showed the holiday eggs being used as center pieces on the table, too.


I wanted to make my own version of this spring display at Dolce Home, where I work as an  interior designer. Although they have the holiday eggs for sale at the store or online at Pottery Barn.com, I decided to make my own with a few changes. First, I wanted mine to be multi-colored. Instead of white eggs I chose light blue, light pink, and light yellow eggs from Joann Fabric and Craft Store. Second, I wanted to use a decorative ribbon instead of twine, so I chose a cream ribbon with scalloped edges. Next, I bought black scrapbook letters to use instead of painting on the letters. Last, I wanted the eggs to say
"Happy Spring" instead of "Happy Easter" so that the display could hang in the shop for all of spring!


Everyone who visits the shop loves our new spring display. So, thank you Pottery Barn for giving me the EGGcellent idea to create my own "Happy Spring" eggs!!